Hi everyone, Vorotamoroz here. Hope you are doing well! I am recovering and doing much better now.
Now, I am writing this article to share some big news with you[1].
Peer-to-Peer Sync is coming!
At v0.24.11, Self-hosted LiveSync has implemented Peer-to-Peer Replicator, which allows direct connection and synchronisation between devices, without the need for a server (even though if it is an experimental implementation).
Peer-to-Peer Replicator is implemented using a direct connection technology called WebRTC, which allows browser-to-browser communication. Until a while ago, this was often difficult to establish connections, but thanks to the recent boom in web conferencing, it has become possible to connect smoothly in many environments.
Basically, WebRTC communication is end-to-end encrypted by default, so there is no additional encryption overhead. In addition, it connects via the optimal route automatically. Hence, if devices are on the same local network, communication will stay within that network.. Very secure.
However, in order to discover this "route", it is necessary to exchange information with each other. This usually requires a signalling server, but surprisingly, thanks to the library Trystero, it is possible to use Nostr's relay as a signalling server. This approach is remarkably open. This time, we can leverage server-side implementations entirely developed by others.
As a precaution, I would like you to use my test relay[2] for now, instead of using an external relay with this experimental implementation. Of course, you can also build your own server.
The signalling server does not transfer real data. However, encrypted device information will flow. If you are concerned about this, you can create your own relay or turn off the LiveSync-like function (which will be explained later) during synchronization.
Setup is now very easy. I would love to explain it in this article.
Also, most of the features of Self-hosted LiveSync are still available. I have disabled some features, such as rebuilding the remote, but that is about it. The multi-master replication of PouchDB shines.
The main drawback is that devices need to be online simultaneously to synchronise unless the device that holds the data is turned on. Of course, it is a bit troublesome. However, this is also a way to look at it as safe. To avoid this hassle, I have created a browser version of Peer-to-Peer sync function. Little by little, the hard work of peeling off and abstracting the functions that are attached to the platform is finally... phew... I haven't hosted it yet, so I'll host it when I get a chance.
If you keep Obsidian with Peer-to-Peer sync enabled, or if you keep this web version open on some device, you can connect to it as a hub.
How to use Peer-to-Peer Sync
The following is a brief explanation of how to set up and use Peer-to-Peer Sync.
Setup
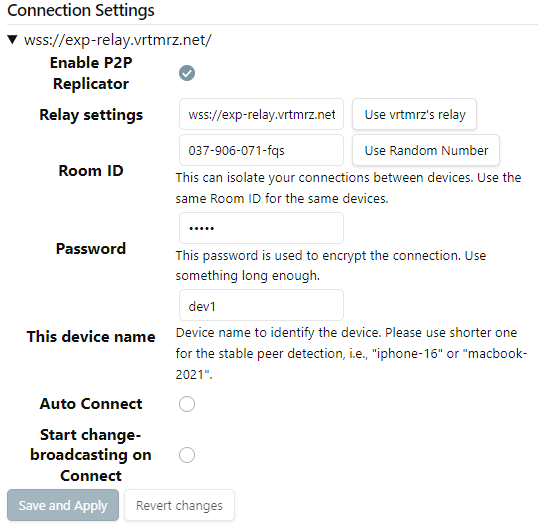
Indeed, there are not many settings. When you execute Open P2P Replicator from the ribbon icon or Command palette, a tab like the one below will be displayed. If you are surprised to see a long explanation, I would like to say that all you need is Enable P2P Replicator, Room ID, Password, and This device name.
Note: In case there are unsaved changes, it will be highlighted.
Enable P2P Replicator
The main switch. As a precaution, it is possible to disable the entire replication until the configuration has been confirmed.Relay settings
Relay for signalling. It is used to discover the route. It is possible to use an external relay, but it is recommended to use the test server for now. [3]Use vrtmrz's relayto specify the test server.Room ID
This is the ID that uniquely identifies you on the signalling server. It is unique in combination with the password, but it is recommended to use a random one.Use Random Numberis OK. It is divided into 3 characters for easy input. The alphabet only appears in the last frame. Of course, you can use any format when entering it yourself. If you use a very long string, it may not be found by the other party.Password
The password for encryption. Even if the Room ID matches, it will not be possible to connect unless the password matches. Please set something good one; likedaisy-and-parrot6. (No meaning, just an example).This device name
The device name. Note that if it is too long, it may not connect well. And by default, the vault name is included, so it may be too long on mobile.
As mentioned later, the decision to accept or deny the connection is saved with this device name.Ideally, it should be unique while balancing length and recognizability.vrt-iphone-16e.g., or something.Auto Connect
If we check this, it will connect to the signalling server at startup. It is better to do this after the configuration has been confirmed. If you want to make your presence as inconspicuous as possible, it is better to build your own relay and then enable this.Start change-broadcasting on Connect
LiveSync, i.e., real-time synchronization requires notification of changes. While connected, it can be started manually withSignalling Server Connection'sStart Broadcasting. If you want to reduce traffic as much as possible, you can leave it disabled (however, this is broadcasted via Peer-to-peer).
There was a long explanation of the settings to get to this point, but in fact, we can set it up with just Room ID, Password, and This device name. Shall we try it, lovely mates?
Connect!
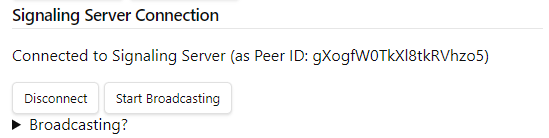
Clicking Connect in signalling Server Connection will show the following, if we are successfully connected to the signalling server.
And, the devices that have the same settings should be displayed in Peers.
This is how it looks (the left side is the screen of dev_1 and the right side is the screen of dev_recv).
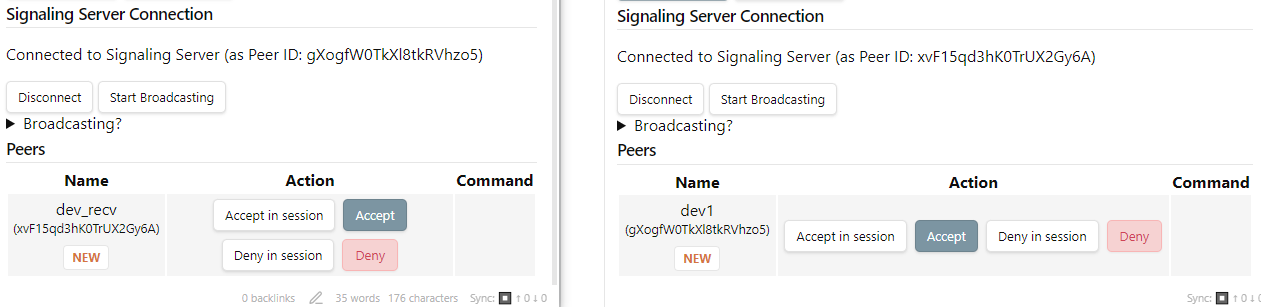
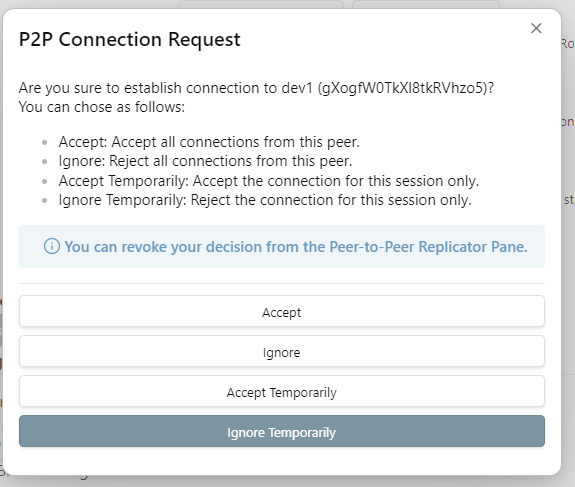
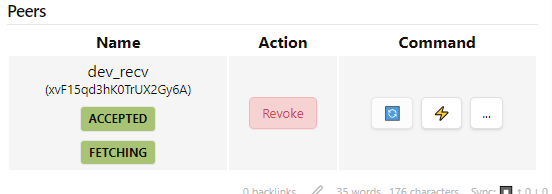
Peer ID will be displayed under the device name. If you can confirm that it is the intended device, try Accept. (By the way, if it is a suspicious device, please do not hesitate to Deny. The fact that you Deny will not be communicated to the other party. Well, since the connection will not be established in the first place, I do not think there are many cases, but if it is a suspicious case, please do it anyway).
If we Accept, the display will look like this.
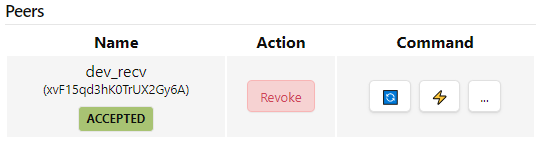
Remember that the device name is saved. If you want to revoke the permission, you can do so with Revoke.
Here, as usual (in our things), the emoji icon is a bit difficult to understand at first glance, but it has the following items.
| Emoji icon | Function |
|---|---|
| 🔄 | Start synchronisation |
| ⚡ | Start Watch. If the other party is doing Change-broadcasting, Synchronisation will be triggered as like LiveSync |
| ... | Open the sub-menu |
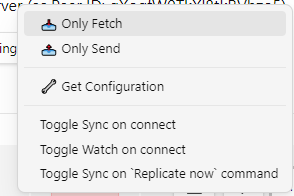
Submenu has the following items.
| Title | Function |
|---|---|
| Only Fetch | Apply remote changes locally without sending local changes. |
| Only Send | Ask peer to fetch local changes. |
| Get Configuration | Copy the configuration from the other party. This is intended to be used for the second device after setting up only Peer-to-peer. It is quite fast with Peer-to-peer. |
| Toggle Sync on connect | Enable/disable the setting to sync as soon as this device is found |
| Toggle Watch on connect | Enable/disable the setting to watch as soon as this device is found |
Toggle Sync on Replicate now command | Set/unset synchronisation target on performing Replicate now (If Peer-to-peer sync is enabled and the sync mode is set to Only P2P), or Replicate now by P2P (if the sync mode is set to something else) it will be set/removed as a target for sync when executing Replicate now by P2P. |
Well, I think the only one we usually use is 🔄. Now, let's click it.
If the other party has not Accepted it on their device, a dialogue like the one below will be displayed, asking for permission (by the way, if it takes time to respond, even if we approve it, the synchronisation will fail this time. If we leave it alone, Ignore temporary will be selected. The decision of Temporary is valid until restart). Click Accept.
When the permission is granted, FETCHING or something like that will be displayed under the device name, as shown below.
And, if we are using Show status inside the editor, the transfer status will be displayed with the device name, just like other synchronisation methods.
How to use Get Configuration
When we use Get Configuration, we can obtain all settings from the other device via Peer-to-peer. At this time, since the CouchDB password and E2EE passphrase are also included, the source device is requested will ask for the passphrase.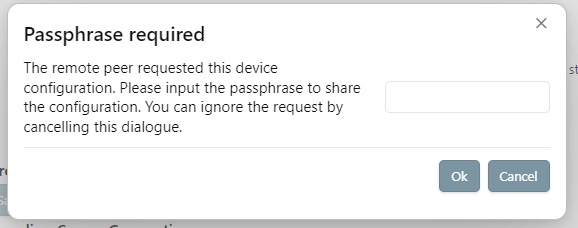
After entering the passphrase or cancelling it, a dialogue will be displayed on the requesting side as well.
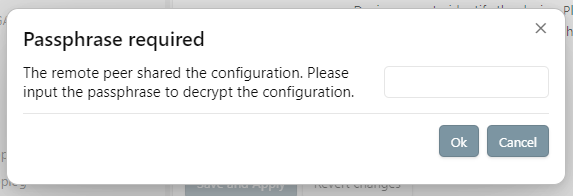
If we cancel it, a dummy password encrypted with a random passphrase will be returned. If you encounter an unintended passphrase request, please cancel it and change the Room ID and passphrase as soon as possible.
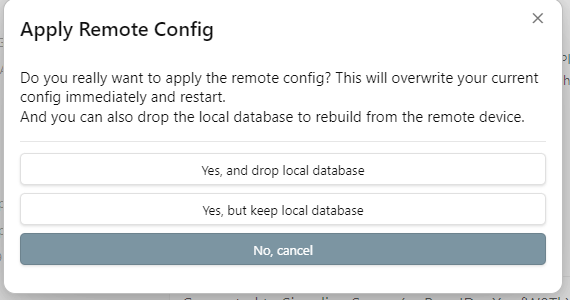
If we have decrypted it successfully, we will be asked how to apply it. Basically, it is recommended to discard the local database and have a Fetch equivalent action.
Answering this will ask if we want to temporarily set the sync mode to P2P Only for Fetch. Yes is fine.
Confirmation we get as usual will be displayed…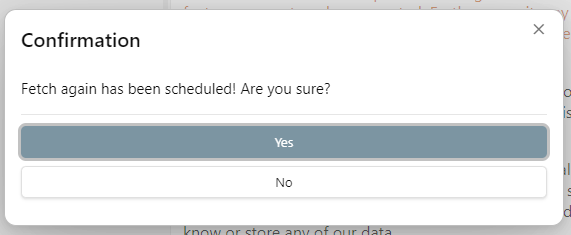
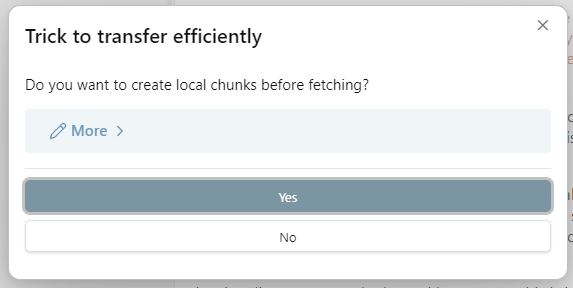
And we will be asked if we want to create a chunk locally…
And when we are ready, we will be asked if it is okay to enable P2P Sync because it is disabled. Yes.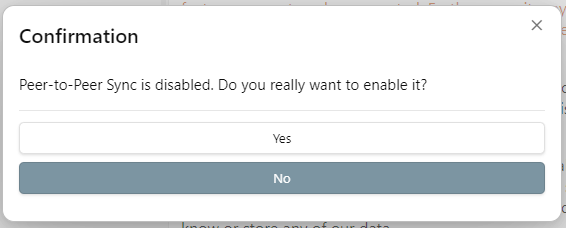
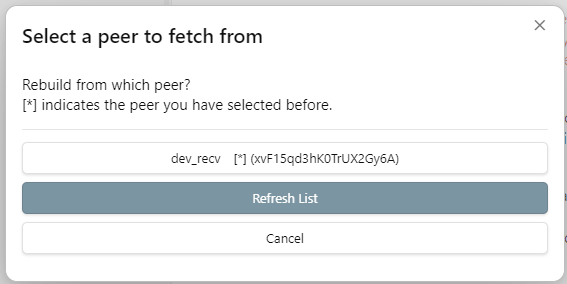
Therefore, connecting to the signalling server and waiting for other devices to appear.
At this time, the one with [*] is the device that was previously Get Configuration.
(If no devices appear, please Refresh List. Self-hosted LiveSync waits a moment).
Total of 2 times will be asked (this is actually the same as when connecting to CouchDB or MinIO, but in the case of Peer-to-peer sync, it stands out a bit because there is a peer selection). This is a mechanism to ensure that it is synchronised.
Et, cetera
This Peer-to-Peer mode has been implemented several times, but every time I had problems like "WebRTC does not establish at all" or "the library does not transfer the binary well", and I had to give up. This time, I was able to realise this, and I am quite moved. I think we have achieved almost completely free synchronisation, isn't it? I know that you already know this deeply, but let me point out again that this; free means freedom or free from authority, not free of charge.
Well, the naming is a bit of a problem, right? It is like "Self-hosted LiveSync" but does not require a self-hosted host... This is also related to the issue that has come up recently, where it's unclear whether LiveSync refers to the plugin name or the sync mode. It's quite a mess... I hope to address this with localisation as I have implemented a feature that allows for significant message modification.
And, if you have any questions about Peer-to-peer sync, please feel free to contact me anytime on Twitter (now X) or Nostr. Of course, GitHub issues are also welcome[4].
So, that is it for now, lovely!
I would like to write more frequently, but it has turned into a significant. And, this English one is quite a bit of work. ↩︎
This test relay is running on a very weak machine, so if it starts to scream, I may have to start over. ↩︎
Looking at the Trystero repository, I also see that it is frowned upon a bit by the relay admins. I consider this to be part of Nostr... ↩︎
Many issues are kept open, I will try my best! ↩︎